
OpenVPN
Virtual Private Network
| 方案 | 区别 |
|---|---|
| 专线 | 不差钱 |
| 硬件vpn设备 | 成本低 |
| 开源软件 | pptp(兼容性差)、OpenVPN(数据加密、便于用户可以访问内网,内网) 、IpSEC、OpenSwan |
应用场景
远程访问企业内网

多分支互通
架构
| 角色 | 地址 |
|---|---|
| OpenVPN_Server(开启内核转发功能) | eth0:192.168.10.30/24、eth1:172.16.10.30/24 |
| DB | 172.16.10.31/24 (不需要设置网关,只设置ip即可) |
| OpenVPN_Client | 192.168.10.88/24 |
# 开启内核转发功能
[root@localhost easy-rsa]# vim /etc/sysctl.conf
[root@localhost easy-rsa]# sysctl -p
net.ipv4.ip_forward = 1
CA
| 角色 | 功能 |
|---|---|
| 客户端 | CA证书:client密钥(加密) |
| 服务端 | CA证书:server密钥(解密) |
| CA | 可以自己创建 |
mariadb开启远程访问
MariaDB [mysql]> GRANT ALL PRIVILEGES ON *.* TO 'root'@'%'WITH GRANT OPTION;
Query OK, 0 rows affected (0.00 sec)

MariaDB [mysql]> GRANT ALL PRIVILEGES ON *.* TO 'root'@'%' IDENTIFIED BY '123456';
Query OK, 0 rows affected (0.00 sec)

MariaDB [mysql]> FLUSH PRIVILEGES;
Query OK, 0 rows affected (0.00 sec)
easy-rsa
创建证书需要一个工具
### 下载easy-rsa
[root@zabbixserver ~]#  yum install epel-release.noarch -y
[root@zabbixserver ~]#  rpm -Uvh https://mirror.webtatic.com/yum/el7/webtatic-release.rpm
[root@zabbixserver ~]#  curl -o /etc/yum.repos.d/CentOS-Base.repo https://mirrors.aliyun.com/repo/Centos-7.repo
[root@zabbixserver ~]#  curl -o /etc/yum.repos.d/epel.repo http://mirrors.aliyun.com/repo/epel-7.repo
[root@zabbixserver ~]# yum install easy-rsa -y


### 准备vars(充当CA权威机构)
[root@localhost ~]# mkdir /opt/easy-rsa
[root@localhost ~]# cd /opt/easy-rsa/
# 复制目录下所有文件
[root@localhost easy-rsa]# cp -a /usr/share/easy-rsa/3.0.8/* ./
[root@localhost easy-rsa]# cp /usr/share/doc/easy-rsa-3.0.8/vars.example vars
[root@localhost easy-rsa]# egrep -v '^$|^#' vars
if [ -z "$EASYRSA_CALLER" ]; then
        echo "You appear to be sourcing an Easy-RSA 'vars' file." >&2
        echo "This is no longer necessary and is disallowed. See the section called" >&2
        echo "'How to use this file' near the top comments for more details." >&2
        return 1
fi
# 按需修改
[root@localhost easy-rsa]# vim vars
if [ -z "$EASYRSA_CALLER" ]; then
        echo "You appear to be sourcing an Easy-RSA 'vars' file." >&2
        echo "This is no longer necessary and is disallowed. See the section called" >&2
        echo "'How to use this file' near the top comments for more details." >&2
        return 1
fi
set_var EASYRSA_DN "cn_only"
set_var EASYRSA_REQ_COUNTRY "CN"
set_var EASYRSA_REQ_PROVINCE "Henan"
set_var EASYRSA_REQ_CITY "Kaifeng"
set_var EASYRSA_REQ_ORG "soulboy"
set_var EASYRSA_REQ_EMAIL "410686931@qq.com"
set_var EASYRSA_NS_SUPPORT "yes"

# 查看当前目录结构
[root@localhost easy-rsa]# tree
.
├── easyrsa
├── openssl-easyrsa.cnf
├── vars
└── x509-types
    ├── ca
    ├── client
    ├── code-signing
    ├── COMMON
    ├── email
    ├── kdc
    ├── server
    └── serverClient

### 1、初始化,在当前目录下创建PKI目录,用于存储证书
[root@localhost easy-rsa]# ./easyrsa init-pki
Note: using Easy-RSA configuration from: /opt/easy-rsa/vars
init-pki complete; you may now create a CA or requests.
Your newly created PKI dir is: /opt/easy-rsa/pki

[root@localhost easy-rsa]# tree pki
pki
├── openssl-easyrsa.cnf
├── private
├── reqs
└── safessl-easyrsa.cnf

### 2、创建CA证书
[root@localhost easy-rsa]# ./easyrsa build-ca

Note: using Easy-RSA configuration from: /opt/easy-rsa/vars
Using SSL: openssl OpenSSL 1.0.2k-fips  26 Jan 2017

Enter New CA Key Passphrase:		# 1qaz2wsx
Re-Enter New CA Key Passphrase:		# 1qaz2wsx
Generating RSA private key, 2048 bit long modulus
.........+++
....+++
e is 65537 (0x10001)
You are about to be asked to enter information that will be incorporated
into your certificate request.
What you are about to enter is what is called a Distinguished Name or a DN.
There are quite a few fields but you can leave some blank
For some fields there will be a default value,
If you enter '.', the field will be left blank.
-----
Common Name (eg: your user, host, or server name) [Easy-RSA CA]:	# 直接回车

CA creation complete and you may now import and sign cert requests.
Your new CA certificate file for publishing is at:
/opt/easy-rsa/pki/ca.crt	# 证书的路径和名字

### CA准备完毕
# 公钥
 [root@localhost easy-rsa]# cat /opt/easy-rsa/pki/ca.crt

# 私钥
[root@localhost easy-rsa]# cat /opt/easy-rsa/pki/private/ca.key


### 3、创建server端证书和私钥文件,请给server端证书签名
# 创建server端证书和私钥文件,nopass表示不加密私钥文件,其他可默认 (直接回车)
[root@localhost easy-rsa]# ./easyrsa gen-req server nopass
req: /opt/easy-rsa/pki/reqs/server.req	# 证书请求文件(CA签名之后可以变为公钥)
	/opt/easy-rsa/pki/issued/server.crt	# 被CA签署之后生成的证书会在这里(这里还没有被CA签署完毕)
key: /opt/easy-rsa/pki/private/server.key 	# 私钥

# 请给server端证书签名,首先是对一些信息的确认,可以输入yes,然后创建ca根证书时设置的密码(1qaz2wsx)
[root@localhost easy-rsa]# ./easyrsa sign server server
[root@localhost easy-rsa]# ./easyrsa sign server server

Note: using Easy-RSA configuration from: /opt/easy-rsa/vars
Using SSL: openssl OpenSSL 1.0.2k-fips  26 Jan 2017


You are about to sign the following certificate.
Please check over the details shown below for accuracy. Note that this request
has not been cryptographically verified. Please be sure it came from a trusted
source or that you have verified the request checksum with the sender.

Request subject, to be signed as a server certificate for 825 days:

subject=
    commonName                = server


Type the word 'yes' to continue, or any other input to abort.
  Confirm request details: yes  # 这里只能yes
Using configuration from /opt/easy-rsa/pki/easy-rsa-3453.MVe7kQ/tmp.YN349D
Enter pass phrase for /opt/easy-rsa/pki/private/ca.key:	# CA密码(1qaz2wsx)
Check that the request matches the signature
Signature ok
The Subject's Distinguished Name is as follows
commonName            :ASN.1 12:'server'
Certificate is to be certified until Jan  1 05:23:16 2026 GMT (825 days)

Write out database with 1 new entries
Data Base Updated

Certificate created at: /opt/easy-rsa/pki/issued/server.crt	# 证书创建完毕

# 创建Diffie-Hellman文件(密钥交换时的Diffie-Hellman算法),需要耗费一些时间
[root@localhost easy-rsa]# ./easyrsa gen-dh
DH parameters of size 2048 created at /opt/easy-rsa/pki/dh.pem

### server端通用的CA证书、服务端证书(公钥)和私钥
/opt/easy-rsa/pki/ca.crt	# 服务端通用的CA证书
/opt/easy-rsa/pki/private/server.key	# 服务端公钥
/opt/easy-rsa/pki/issued/server.crt	# 服务端证书(公钥)
/opt/easy-rsa/pki/private/server.key	# 服务端私钥

### 4、创建client端证书和私钥文件,请给client端证书签名
# 创建client端证书和私钥文件,nopass表示不加密私钥文件,其他可默认 (直接回车)
[root@localhost easy-rsa]# ./easyrsa gen-req client nopass
req: /opt/easy-rsa/pki/reqs/client.req		# 证书请求文件(CA签名之后可以变为公钥)
	/opt/easy-rsa/pki/issued/client.crt		# 被CA签署之后生成的证书会在这里(这里还没有被CA签署完毕)
key: /opt/easy-rsa/pki/private/client.key	# 私钥

# 请给client端证书签名,首先是对一些信息的确认,可以输入yes,然后创建ca根证书时设置的密码(1qaz2wsx)
[root@localhost easy-rsa]# ./easyrsa sign client client


### client端证书(公钥)和私钥
/opt/easy-rsa/pki/issued/client.crt		# 服务端证书(公钥)
/opt/easy-rsa/pki/private/client.key	# 服务端私钥


### 总结
/opt/easy-rsa/pki/ca.crt		# 通用的CA证书(服务端和客户端都会用到)
/opt/easy-rsa/pki/dh.pem	# 认证算法(服务端用)
/opt/easy-rsa/pki/issued/server.crt	# server 端证书(公钥)
/opt/easy-rsa/pki/issued/client.crt	# client 端证书(公钥)
/opt/easy-rsa/pki/private/server.key	# server 端证书(私钥)
/opt/easy-rsa/pki/private/client.key	# client 端证书(私钥)
部署OpenVPN服务端
### 安装OpenVPN
[root@localhost easy-rsa]# yum install openvpn -y

# 配置文件模板位置
/usr/share/doc/openvpn-2.4.12/sample/sample-config-files/server.conf

# 配置server端主配置文件(注解版,注解要去掉)
[root@localhost easy-rsa]# vim /etc/openvpn/server.conf
port 1194			# 端口
proto udp			# 协议
dev tun				# 采用路由隧道模式tun
ca ca.crt		# ca证书文件位置  默认是/etc/openvpn  server端:/etc/openvpn/server   规范可以这样写server/ca.crt
cert server.crt		# 服务端公钥名称	 默认是/etc/openvp
key server.key		# 服务端私钥名称   默认是/etc/openvp
dh dh.pem			# 交换证书 默认是/etc/openvp
server 10.8.1.0 255.255.255.0	# 给客户端分配地址池,注意:不能和VPN服务器内网网段有相同,这里VPN内网网段是172.16.10.0/24
push "route 172.16.10.0 255.255.255.0"	# 允许客户端访问内网172.16.10.0/24网段
ifconfig-pool-persist ipp.txt	# 地址池记录文件位置
keepalive 10 120	# 存活时间,10秒ping一次,120没有收到响应就视为短线
max-clients	100 	# 最多允许100个客户端连接
status openvpn-status.log	# 日志记录位置 openvpn状态
verb 3 				# openvpn版本
client-to-client 	# openvpn多个客户端之间也能互通
log /var/log/openvpn.log 	# openvpn日志记录位置
persist-key 		# 通过keepalive检测超时后,重新启动VPN,不重新 读取keys,保留第一次使用的keys
persist-tun 		# 检测超时后,重新启动VPN,一直保持tun是linkup的,否则网络会先linkdown然后再linkup
duplicate-cn 		# 允许每个客户端的公钥私钥相同(所有人密钥一样,但是可以根据密钥创建不同的用户名和密码)

# 配置server端主配置文件(纯净版)
[root@localhost easy-rsa]# vim /etc/openvpn/server.conf
port 1194
proto udp
dev tun
ca ca.crt
cert server.crt
key server.key
dh dh.pem
server 10.8.1.0 255.255.255.0
push "route 172.16.10.0 255.255.255.0"
ifconfig-pool-persist ipp.txt
keepalive 10 120
max-clients	100
status openvpn-status.log
verb 3
client-to-client
log /var/log/openvpn.log
persist-key
persist-tun
duplicate-cn

# 复制通用ca证书、server公钥、server私钥、dh.pem文件
[root@localhost easy-rsa]# cp /opt/easy-rsa/pki/ca.crt  /etc/openvpn/	# 通用的CA证书
[root@localhost easy-rsa]# cp /opt/easy-rsa/pki/issued/server.crt  /etc/openvpn/	# server公钥
[root@localhost easy-rsa]# cp /opt/easy-rsa/pki/private/server.key  /etc/openv		# server私钥
[root@localhost easy-rsa]# cp /opt/easy-rsa/pki/dh.pem /etc/openvpn/	# 加密算法文件

# 启动OpenVPN服务
[root@localhost easy-rsa]# systemctl enable openvpn@server.service
[root@localhost easy-rsa]# systemctl start openvpn@server.service

# 检查进程
[root@localhost easy-rsa]# ps -ef | grep openvpn
root      3843     1  0 15:07 ?        00:00:00 /usr/sbin/openvpn --cd /etc/openvpn/ --config server.conf


# 检查端口
[root@localhost easy-rsa]# ss -lntup | grep 1194
udp    UNCONN     0      0         *:1194                  *:*                   users:(("openvpn",pid=3843,fd=6))

# 查看启动日志
[root@localhost easy-rsa]# tail -f /var/log/openvpn.log

Fri Sep 29 15:07:48 2023 OpenVPN 2.4.12 x86_64-redhat-linux-gnu [Fedora EPEL patched] [SSL (OpenSSL)] [LZO] [LZ4] [EPOLL] [PKCS11] [MH/PKTINFO] [AEAD] built on Mar 17 2022
Fri Sep 29 15:07:48 2023 library versions: OpenSSL 1.0.2k-fips  26 Jan 2017, LZO 2.06
Fri Sep 29 15:07:48 2023 WARNING: --ifconfig-pool-persist will not work with --duplicate-cn
Fri Sep 29 15:07:48 2023 Diffie-Hellman initialized with 2048 bit key
Fri Sep 29 15:07:48 2023 ROUTE_GATEWAY 192.168.10.1/255.255.255.0 IFACE=enp0s3 HWADDR=08:00:27:e5:0d:bf  # 发现网关
Fri Sep 29 15:07:48 2023 TUN/TAP device tun0 opened	# 添加openvpn虚拟网卡 tun0
Fri Sep 29 15:07:48 2023 TUN/TAP TX queue length set to 100
Fri Sep 29 15:07:48 2023 /sbin/ip link set dev tun0 up mtu 1500
Fri Sep 29 15:07:48 2023 /sbin/ip addr add dev tun0 local 10.8.1.1 peer 10.8.1.2	# 给tun0设置ip 10.8.1.1 10.8.1.2(也是服务端用)
Fri Sep 29 15:07:48 2023 /sbin/ip route add 10.8.1.0/24 via 10.8.1.2	# 在系统中添加路由信息:只要找10.8.1.0/24 请找 10.8.1.2
Fri Sep 29 15:07:48 2023 Could not determine IPv4/IPv6 protocol. Using AF_INET
Fri Sep 29 15:07:48 2023 Socket Buffers: R=[212992->212992] S=[212992->212992]
Fri Sep 29 15:07:48 2023 UDPv4 link local (bound): [AF_INET][undef]:1194
Fri Sep 29 15:07:48 2023 UDPv4 link remote: [AF_UNSPEC]
Fri Sep 29 15:07:48 2023 MULTI: multi_init called, r=256 v=256
Fri Sep 29 15:07:48 2023 IFCONFIG POOL: base=10.8.1.4 size=62, ipv6=0
Fri Sep 29 15:07:48 2023 IFCONFIG POOL LIST
Fri Sep 29 15:07:48 2023 Initialization Sequence Completed


# 查看ip地址 发现多一个tun0
[root@localhost easy-rsa]# ip addr
 inet 10.8.1.1 peer 10.8.1.2/32 scope global tun0

# 查看路由
[root@localhost easy-rsa]# yum install net-tools -y
[root@localhost easy-rsa]# route -n
Kernel IP routing table
Destination     Gateway         Genmask         Flags Metric Ref    Use Iface
0.0.0.0         192.168.10.1    0.0.0.0         UG    100    0        0 enp0s3
10.8.1.0        10.8.1.2        255.255.255.0   UG    0      0        0 tun0
10.8.1.2        0.0.0.0         255.255.255.255 UH    0      0        0 tun0
172.16.10.0     0.0.0.0         255.255.255.0   U     101    0        0 enp0s8
192.168.10.0    0.0.0.0         255.255.255.0   U     100    0        0 enp0s3
部署OpenVPN客户端类型
| 客户端类型 | 需要的配置文件及密钥 | 下载地址 |
|---|---|---|
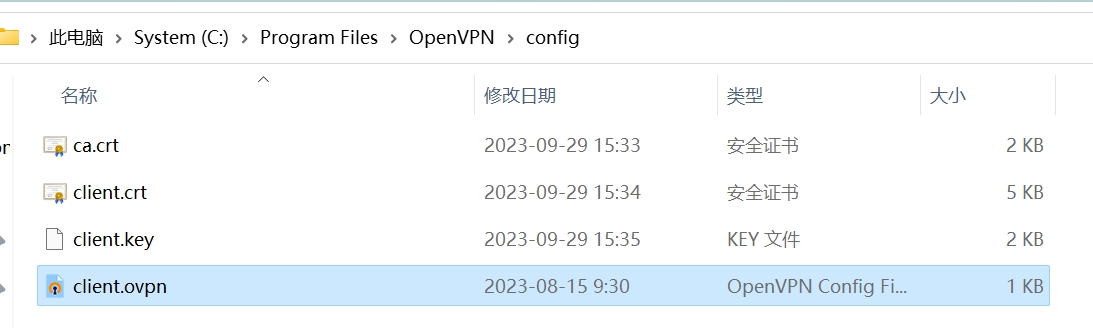
| windows | C:\Program Files\OpenVPN\config[client.ovpn、ca.crt、client.crt、client.key、client.ovpn] | 下载地址 |
| linux | /etc/openvpn/client/client.conf | |
| 安卓、苹果 |
OpenVPN客户端:windows
client.ovpn配置
### 注解版 C:\Program Files\OpenVPN\config\client.ovpn
client	# 指定当前VPN是客户端
dev tun	# 使用tun隧道传输协议
proto udp	# 使用udp协议传输数据
remote 192.168.10.30 1194	# openvpn服务器IP地址端口号
resolv-retry infinite 	# 断线自动重新连接,在网络不稳定的情况下非常有用
nobind 	# 不绑定本地特定的端口号
ca ca.crt	# 指定CA证书的文件路径
cert client.crt	# 指定当前客户端的证书文件路径
key client.key	# 指定当前客户端的私钥文件路径
verb 3	# 指定日志文件的记录级别,0-9,等级越高日志内容越详细
persist-key	# 通过keepalive检测超时后,重新启动vpn,不重新读取keys,保留第一次使用的keys

### 纯净版 C:\Program Files\OpenVPN\config\client.ovpn
client
dev tun
proto udp
remote 192.168.10.30 1194
resolv-retry infinite
nobind
ca ca.crt
cert client.crt
key client.key
verb 3
persist-key

#  查看windows客户端的路由
C:\Users\chao1>route print
===========================================================================
接口列表
  7...74 56 3c 74 20 7d ......Realtek Gaming 2.5GbE Family Controller
 53...........................Wintun Userspace Tunnel
 21...0a 00 27 00 00 15 ......VirtualBox Host-Only Ethernet Adapter
 54...00 ff 5a 32 ca 1b ......TAP-Windows Adapter V9
 59...........................OpenVPN Data Channel Offload
 14...30 05 05 94 07 6a ......Microsoft Wi-Fi Direct Virtual Adapter
 22...32 05 05 94 07 69 ......Microsoft Wi-Fi Direct Virtual Adapter #2
 12...30 05 05 94 07 69 ......Intel(R) Wi-Fi 6E AX210 160MHz #2
 20...30 05 05 94 07 6d ......Bluetooth Device (Personal Area Network)
  1...........................Software Loopback Interface 1
===========================================================================

IPv4 路由表
===========================================================================
活动路由:
网络目标        网络掩码          网关       接口   跃点数
          0.0.0.0          0.0.0.0     192.168.10.1    192.168.10.88    291
        127.0.0.0        255.0.0.0            在链路上         127.0.0.1    331
        127.0.0.1  255.255.255.255            在链路上         127.0.0.1    331
  127.255.255.255  255.255.255.255            在链路上         127.0.0.1    331
     192.168.10.0    255.255.255.0            在链路上     192.168.10.88    291
    192.168.10.88  255.255.255.255            在链路上     192.168.10.88    291
   192.168.10.255  255.255.255.255            在链路上     192.168.10.88    291
     192.168.56.0    255.255.255.0            在链路上      192.168.56.1    281
     192.168.56.1  255.255.255.255            在链路上      192.168.56.1    281
   192.168.56.255  255.255.255.255            在链路上      192.168.56.1    281
        224.0.0.0        240.0.0.0            在链路上         127.0.0.1    331
        224.0.0.0        240.0.0.0            在链路上      192.168.56.1    281
        224.0.0.0        240.0.0.0            在链路上     192.168.10.88    291
  255.255.255.255  255.255.255.255            在链路上         127.0.0.1    331
  255.255.255.255  255.255.255.255            在链路上      192.168.56.1    281
  255.255.255.255  255.255.255.255            在链路上     192.168.10.88    291
===========================================================================
永久路由:
  网络地址          网络掩码  网关地址  跃点数
          0.0.0.0          0.0.0.0     192.168.10.1     默认
===========================================================================


# 启动openvn客户端

# 再次查看windows客户端的路由
C:\Users\chao1>route print
===========================================================================
接口列表
  7...74 56 3c 74 20 7d ......Realtek Gaming 2.5GbE Family Controller
 53...........................Wintun Userspace Tunnel
 21...0a 00 27 00 00 15 ......VirtualBox Host-Only Ethernet Adapter
 54...00 ff 5a 32 ca 1b ......TAP-Windows Adapter V9
 59...........................OpenVPN Data Channel Offload
 14...30 05 05 94 07 6a ......Microsoft Wi-Fi Direct Virtual Adapter
 22...32 05 05 94 07 69 ......Microsoft Wi-Fi Direct Virtual Adapter #2
 12...30 05 05 94 07 69 ......Intel(R) Wi-Fi 6E AX210 160MHz #2
 20...30 05 05 94 07 6d ......Bluetooth Device (Personal Area Network)
  1...........................Software Loopback Interface 1
===========================================================================

IPv4 路由表
===========================================================================
活动路由:
网络目标        网络掩码          网关       接口   跃点数
          0.0.0.0          0.0.0.0     192.168.10.1    192.168.10.88    291
         10.8.1.0    255.255.255.0         10.8.1.5         10.8.1.6    225
         10.8.1.4  255.255.255.252            在链路上          10.8.1.6    281
         10.8.1.6  255.255.255.255            在链路上          10.8.1.6    281
         10.8.1.7  255.255.255.255            在链路上          10.8.1.6    281
        127.0.0.0        255.0.0.0            在链路上         127.0.0.1    331
        127.0.0.1  255.255.255.255            在链路上         127.0.0.1    331
  127.255.255.255  255.255.255.255            在链路上         127.0.0.1    331
      172.16.10.0    255.255.255.0         10.8.1.5         10.8.1.6    225		# 多一条!!!!!!
     192.168.10.0    255.255.255.0            在链路上     192.168.10.88    291
    192.168.10.88  255.255.255.255            在链路上     192.168.10.88    291
   192.168.10.255  255.255.255.255            在链路上     192.168.10.88    291
     192.168.56.0    255.255.255.0            在链路上      192.168.56.1    281
     192.168.56.1  255.255.255.255            在链路上      192.168.56.1    281
   192.168.56.255  255.255.255.255            在链路上      192.168.56.1    281
        224.0.0.0        240.0.0.0            在链路上         127.0.0.1    331
        224.0.0.0        240.0.0.0            在链路上      192.168.56.1    281
        224.0.0.0        240.0.0.0            在链路上     192.168.10.88    291
        224.0.0.0        240.0.0.0            在链路上          10.8.1.6    281
  255.255.255.255  255.255.255.255            在链路上         127.0.0.1    331
  255.255.255.255  255.255.255.255            在链路上      192.168.56.1    281
  255.255.255.255  255.255.255.255            在链路上     192.168.10.88    291
  255.255.255.255  255.255.255.255            在链路上          10.8.1.6    281
===========================================================================
永久路由:
  网络地址          网络掩码  网关地址  跃点数
          0.0.0.0          0.0.0.0     192.168.10.1     默认

# 到此clientOpenVPN连接serverOpenVPN成功,但是数据可以发送过去却没有回应
防火墙设置
###  CentOS 7.0默认使用的是firewall作为防火墙,这里改为iptables
[root@localhost easy-rsa]# systemctl stop firewalld.service
[root@localhost easy-rsa]# systemctl disable firewalld.service
Removed symlink /etc/systemd/system/multi-user.target.wants/firewalld.service.
Removed symlink /etc/systemd/system/dbus-org.fedoraproject.FirewallD1.service.
[root@localhost easy-rsa]# firewall-cmd --state
not running
[root@localhost easy-rsa]# yum install iptables-services
*filter
:INPUT ACCEPT [0:0]
:FORWARD ACCEPT [0:0]
:OUTPUT ACCEPT [0:0]
-A INPUT -m state --state RELATED,ESTABLISHED -j ACCEPT
-A INPUT -p icmp -j ACCEPT
-A INPUT -i lo -j ACCEPT
-A INPUT -p tcp -m state --state NEW -m tcp --dport 22 -j ACCEPT
-A INPUT -p udp -m state --state NEW -m udp --dport 1194 -j ACCEPT	# 这里添加!!!!
-A INPUT -j REJECT --reject-with icmp-host-prohibited
-A FORWARD -j REJECT --reject-with icmp-host-prohibited
COMMIT

[root@localhost easy-rsa]# systemctl enable iptables.service

### OpenVPNServer默认监听的端口是1194 ,
iptables -A INPUT -p udp -m state --state NEW -m udp --dport 1194 -j ACCEPT
解决数据包有去无回:解决方案一:在内网添加路由
### 在所有内网服务器(DB)上添加路由 (内网服务器网关可以不设置,就算设置了也大概率不应该是172.16.10.30 )
[root@localhost]# route add -net 10.8.1.0/24 gw 172.16.10.30

# 测试 ping
C:\Users\chao1>ping 172.16.10.31

正在 Ping 172.16.10.31 具有 32 字节的数据:
来自 172.16.10.31 的回复: 字节=32 时间<1ms TTL=63
来自 172.16.10.31 的回复: 字节=32 时间<1ms TTL=63
来自 172.16.10.31 的回复: 字节=32 时间<1ms TTL=63
来自 172.16.10.31 的回复: 字节=32 时间<1ms TTL=63
# 测试 ssh
C:\Users\chao1>ssh root@172.16.10.31
The authenticity of host '172.16.10.31 (172.16.10.31)' can't be established.
ED25519 key fingerprint is SHA256:oodW/8u4n6zqHi2jFk/3lk+1hiD6/Eut3FBB8rbPeAM.
This key is not known by any other names
Are you sure you want to continue connecting (yes/no/[fingerprint])?
解决数据包有去无回:解决方案二: 在所有内网服务器设置网关(172.16.10.30 openVPNServer内网地址)
### 在所有内网服务器设置网关(172.16.10.30 openVPNServer内网地址)
[root@localhost ~]# cat /etc/sysconfig/network-scripts/ifcfg-enp0s3
TYPE="Ethernet"
PROXY_METHOD="none"
BROWSER_ONLY="no"
BOOTPROTO=static
DEFROUTE="yes"
IPV4_FAILURE_FATAL="no"
IPADDR=172.16.10.31
NETMASK=255.255.255.0
GATEWAY=172.16.10.30
IPV6INIT="yes"
IPV6_AUTOCONF="yes"
IPV6_DEFROUTE="yes"
IPV6_FAILURE_FATAL="no"
IPV6_ADDR_GEN_MODE="stable-privacy"
NAME="enp0s3"
UUID="762d2051-2593-430a-ac5b-f3ea57a1b2f9"
DEVICE="enp0s3"
ONBOOT="yes"
解决数据包有去无回:方案三:iptables(设置网关172.16.10.30 openVPNServer内网地址,同时还可以让内部的服务器通过openvnpserver访问互联网)
### 先决条件:内网的服务器设置网关为192.168.10.30 (openVPNSever的内网地址)
# 本示例:enp0s3(公网 192.168.10.0/24)、enp0s8(内网 172.16.10.0/24)
# 公网IP不固定推荐使用:eth0(公网) eth1(私网络)
iptables -t nat -A POSTROUTING -s 172.16.10.0/24 -o eth0 -j MASQUERADE
iptables -t nat -A POSTROUTING -s 172.16.10.0/24 -o enp0s3 -j MASQUERADE

# 公网IP固定可以使用:这里公网ip地址是 enp0s3(公网):192.168.10.30
iptables -t nat -A POSTROUTING -s 172.16.10.0/24 -o eth0 -j SNAT --to-source ip
iptables -t nat -A POSTROUTING -s 172.16.10.0/24 -o enp0s3 -j SNAT --to-source 192.168.10.30


# 根据自己情况进行调整 :enp0s3(公网)、enp0s8(内网)
[root@localhost easy-rsa]# ip addr
1: lo: <LOOPBACK,UP,LOWER_UP> mtu 65536 qdisc noqueue state UNKNOWN group default qlen 1000
    link/loopback 00:00:00:00:00:00 brd 00:00:00:00:00:00
    inet 127.0.0.1/8 scope host lo
       valid_lft forever preferred_lft forever
    inet6 ::1/128 scope host
       valid_lft forever preferred_lft forever
2: enp0s3: <BROADCAST,MULTICAST,UP,LOWER_UP> mtu 1500 qdisc pfifo_fast state UP group default qlen 1000
    link/ether 08:00:27:e5:0d:bf brd ff:ff:ff:ff:ff:ff
    inet 192.168.10.30/24 brd 192.168.10.255 scope global noprefixroute enp0s3
       valid_lft forever preferred_lft forever
    inet6 fe80::8dcb:3e75:9b12:345e/64 scope link noprefixroute
       valid_lft forever preferred_lft forever
3: enp0s8: <BROADCAST,MULTICAST,UP,LOWER_UP> mtu 1500 qdisc pfifo_fast state UP group default qlen 1000
    link/ether 08:00:27:4f:dd:37 brd ff:ff:ff:ff:ff:ff
    inet 172.16.10.30/24 brd 172.16.10.255 scope global noprefixroute enp0s8
       valid_lft forever preferred_lft forever
    inet6 fe80::8b4:5697:1f57:159d/64 scope link noprefixroute
       valid_lft forever preferred_lft forever
8: tun0: <POINTOPOINT,MULTICAST,NOARP,UP,LOWER_UP> mtu 1500 qdisc pfifo_fast state UNKNOWN group default qlen 100
    link/none
    inet 10.8.1.1 peer 10.8.1.2/32 scope global tun0
       valid_lft forever preferred_lft forever
    inet6 fe80::9859:e477:df01:653/64 scope link flags 800
       valid_lft forever preferred_lft forever
OpenVPN客户端:linux
# 配置文件路径
[root@localhost easy-rsa]# vim /etc/openvpn/client/client.conf
client
dev tun
proto udp
remote 192.168.10.30 1194
resolv-retry infinite
nobind
ca client/ca.crt
cert client/client.crt
key client/client.key
verb 3
persist-key


# 启动方式一
[root@localhost easy-rsa]# /usr/sbin/openvpn --cd /etc/openvpn/ --config client/client.conf

# 启动方式二(推荐)
[root@localhost easy-rsa]# systemctl cat openvpn@client
[root@localhost easy-rsa]# vim /usr/lib/systemd/system/openvpn@.service	# 修改
# /usr/lib/systemd/system/openvpn@.service
[Unit]
Description=OpenVPN Robust And Highly Flexible Tunneling Application On %I
After=network.target

[Service]
Type=notify
PrivateTmp=true
ExecStart=/usr/sbin/openvpn --cd /etc/openvpn/ --config client/%i.conf	# 哲理需要添加client/

[Install]
WantedBy=multi-user.target

[root@localhost easy-rsa]# systemctl start openvpn@client
OpenVPN加密/认证
官方建议
分别为每一个客户端创建证书(虽然安全,但是太繁琐)
| 官方建议 | 拥有者 |
|---|---|
| ca.crt | openvpn服务端 |
| server.crt | openvpn服务端 |
| server.key(dh.pem) | openvpn服务端 |
| ca.crt | openvpn客户端01 |
| client1.crt | openvpn客户端01 |
| client1.key | openvpn客户端01 |
| ca.crt | openvpn客户端02 |
| client2.crt | openvpn客户端02 |
| client2.key | openvpn客户端02 |
最佳实践
所有人的证书和密钥都一样,但以用户名和密码作为区分
| 官方建议 | 拥有者 |
|---|---|
| ca.crt | openvpn服务端 |
| server.crt | openvpn服务端 |
| server.key(dh.pem) | openvpn服务端 |
| ca.crt | openvpn客户端01 |
| client.crt | openvpn客户端01 |
| client.key | openvpn客户端01 |
| 登录的时候输入用户名和密码 soulboy 123456 | |
| ca.crt | openvpn客户端01 |
| client.crt | openvpn客户端02 |
| client.key | openvpn客户端02 |
| 登录的时候输入用户名和密码 leon 654321 |
自定义脚本实现认证功能
### 1、修改OpenVPNSever端主配置文件:开启支持自定义脚本
# 注解版
[root@localhost easy-rsa]# vim /etc/openvpn/server.conf	# 追加
script-security 3	# 允许使用自定脚本
auth-user-pass-verify /etc/openvpn/check.sh  via-env	# 指定认证脚本路径
username-as-common-name		#用户密码登录方式验证

# 纯净版
[root@localhost easy-rsa]# vim /etc/openvpn/server.conf	# 追加
script-security 3
auth-user-pass-verify /etc/openvpn/check.sh  via-env
username-as-common-name


### 2、编写/etc/openvpn/check.sh 认证脚本
# 定义脚本
[root@Web01 ~]# vim /etc/openvpn/check.sh
#!/bin/bash
PASSFILE="/etc/openvpn/openvpnfile"   # 密码文件 用户名 密码明文   (中间通过空格分隔)
LOG_FILE="/var/log/openvpn-password.log"  # 用户登录情况的日志
TIME_STAMP=`date "+%Y-%m-%d %T"`
if [ ! -r "${PASSFILE}" ]; then
    echo "${TIME_STAMP}: Could not open password file \"${PASSFILE}\" for reading." >> ${LOG_FILE}
    exit 1
fi
CORRECT_PASSWORD=`awk '!/^;/&&!/^#/&&$1=="'${username}'"{print $2;exit}'    ${PASSFILE}`
if [ "${CORRECT_PASSWORD}" = "" ]; then
    echo "${TIME_STAMP}: User does not exist: username=\"${username}\",password=\"${password}\"." >> ${LOG_FILE}
    exit 1
fi
if [ "${password}" = "${CORRECT_PASSWORD}" ]; then
    echo "${TIME_STAMP}: Successful authentication: username=\"${username}\"." >> ${LOG_FILE}
    exit 0
fi
echo "${TIME_STAMP}: Incorrect password: username=\"${username}\", password=\"${password}\"." >> ${LOG_FILE}
exit 1


# 修改脚本权限
[root@localhost easy-rsa]# chmod 600 /etc/openvpn/check.sh
[root@localhost easy-rsa]# chmod +x /etc/openvpn/check.sh

### 3、创建用户(不需要在系统中存在,在/etc/openvpn/openvpnfile文件中存在即可)
# 创建用户(空格作为分隔)
[root@localhost easy-rsa]# vim /etc/openvpn/openvpnfile
soulboy 123456
leon 654321

# 重启openvpnserver服务
[root@localhost easy-rsa]# systemctl restart openvpn@server.service
openvpn客户端配置
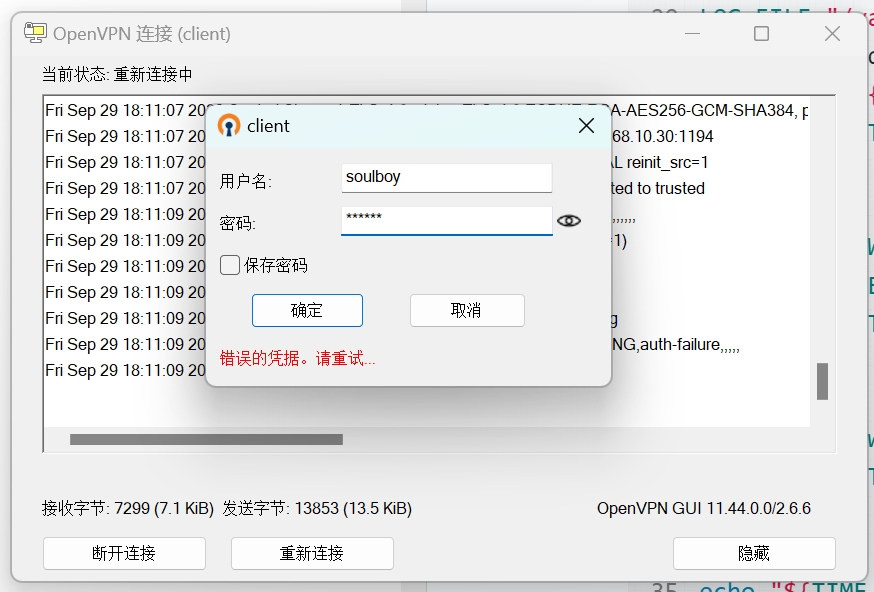
### 修改客户端配置文件 C:\Program Files\OpenVPN\config\client.ovpn
# 追加
auth-user-pass
### OpenVPNServer 查看日志 /var/log/openvpn-password.log
[root@localhost easy-rsa]# tail -f /var/log/openvpn-password.log
2023-09-29 18:11:08: User does not exist: username="asd",password="asd".
2023-09-29 18:11:32: Successful authentication: username="soulboy".
补充
###  自动化
wget -O openvpn.sh https://get.vpnsetup.net/ovpn
sudo bash openvpn.sh --auto

### 备用脚本地址
https://github.com/hwdsl2/openvpn-install/raw/master/openvpn-install.sh
https://gitlab.com/hwdsl2/openvpn-install/-/raw/master/openvpn-install.sh


### OpenVPN 客户端(全平台)
https://openvpn.net/vpn-client/

### 安卓OpenVPN
https://apkcombo.com/tw/openvpn/net.openvpn.openvpn/download/apk