容器与镜像
Docke Architecture
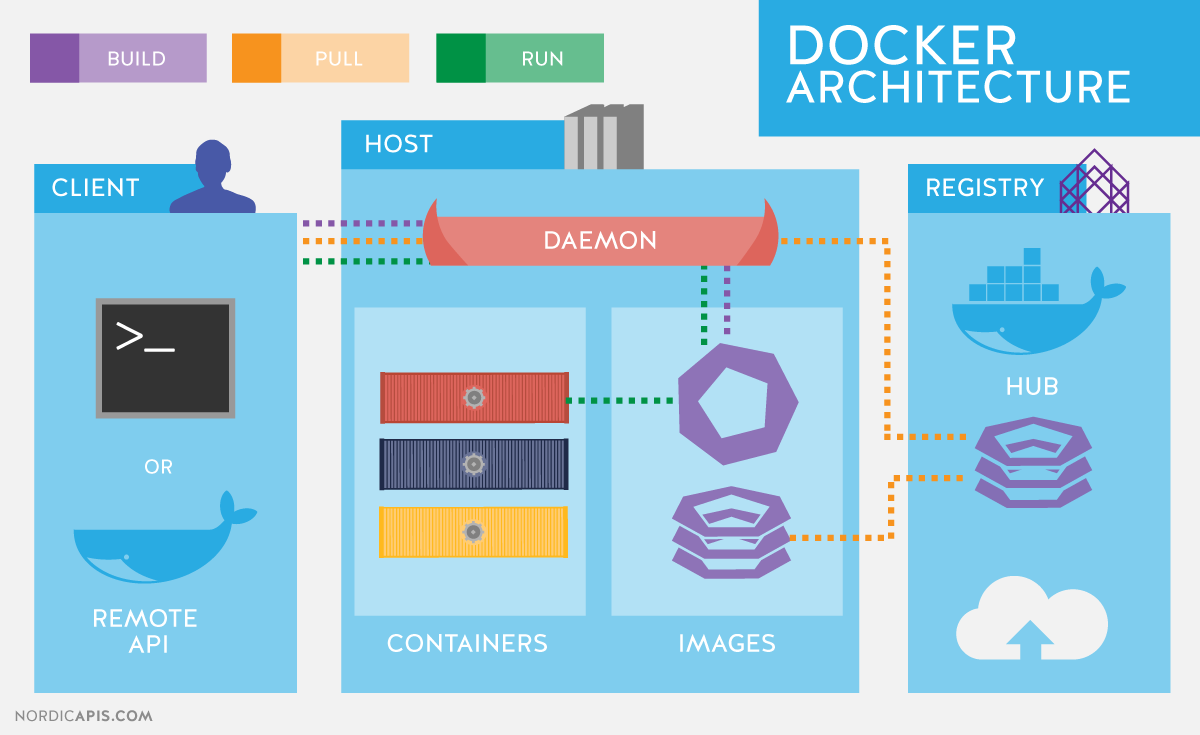
Docker客户端
Docker Client的主要目的是提供一种方法来指导从注册中心里提取镜像并使其在Docker主机上运行。
DockerHost
Docker主机提供了一个完整的环境来执行和运行应用程序。它包括Docker守护程序,镜像,容器,网络和存储。如前所述,守护进程负责所有与容器相关的操作,并通过CLI或REST API接收命令。它还可以与其他守护进程通信,以管理其服务。Docker守护程序根据客户端的请求提取和构建容器镜像。一旦它提取了请求的镜像,它就会利用一组称为构建文件的指令为容器构建一个工作模型。构建文件还可以包括守护程序在运行容器之前预加载其他组件的指令,或者在构建容器之后将指令发送到本地命令行的指令。
Docker对象
各种对象用于组装应用,docker的主要对象如下:
- Images:用于构建容器的只读二进制模版,可以通过私有或公共注册中心获取。
- Containers:容器是运行应用程序的封装环境。容器由映像和启动容器时提供的任何其他配置选项定义,包括但不限于网络连接和存储选项。容器只能访问映像中定义的资源,除非在将映像构建到容器中时定义了其他访问权限。
- Networking:Docker以应用程序驱动的方式实现网络,并提供各种选项,同时为应用程序开发人员保留足够的抽象。
- Storage:用于持久化应用数据。
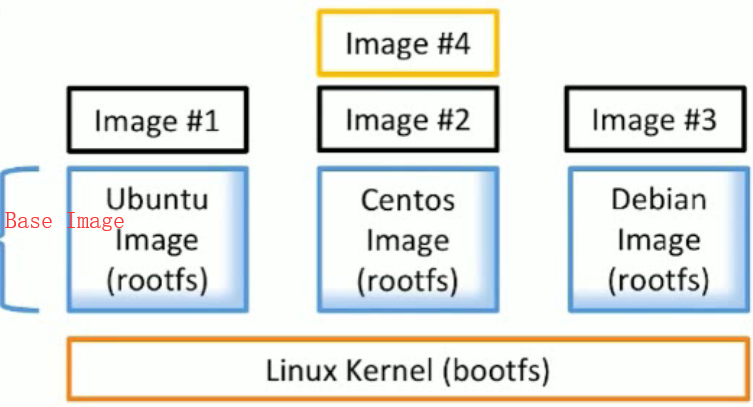
Linux底层技术的支持
- Namespaces:让多个容器之间相互隔离,每个容器有独立的pid、net、ipc、mnt、uts。
- Control groups:对容器做资源限制,为不同的容器分配不同的硬件资源。
- Union file systems:Container和image的分层。
Image简介
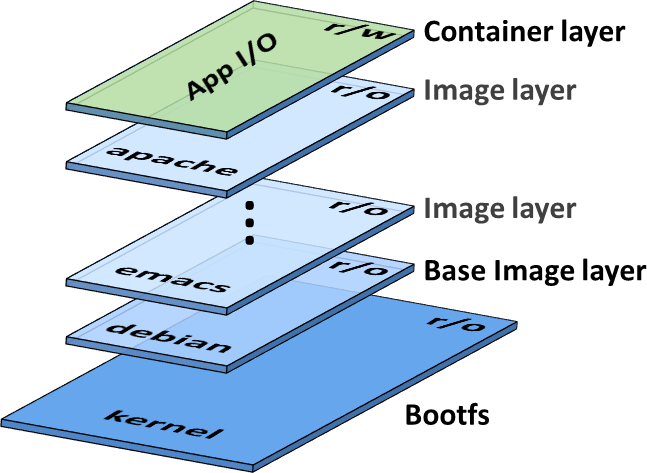
- 文件和meta data的集合(root filesystem)。
- 分层的,并且每一层都可以添加改变删除文件,成为一个新的image。
- 不同的image可以共享相同的layer。
- Image本身是read-only的。
查看镜像分层、元数据
[root@localhost ~]# docker image inspect redis:latest
            "Layers": [
                "sha256:cf5b3c6798f77b1f78bf4e297b27cfa5b6caa982f04caeb5de7d13c255fd7a1e",
                "sha256:1f34edf2a6aacf60086a6caecb2ceacfb6e1f7b24d659ed91e0bbdca47e13686",
                "sha256:3ba3251341dc82ef8984b687dca38b85d41210a18ad8afaf637d7f9c22199780",
                "sha256:633cc0abe0bf7866b76409e5b6299da578b406239405e3c2f8d48f02fb410925",
                "sha256:5f58a275fe5e91edaa7bb070b4c582dd2c2acb200ca9cea00beedb620cdbe2d1",
                "sha256:f37c36c3db455fbd01876554875293088798eb31f159d862a8f9593c32ffe15d"
            ]
根据摘要拉取镜像(防止不同镜像使用同一tag)
# 查看指定镜像的摘要信息
[root@localhost ~]# docker image ls --digests alpine
REPOSITORY          TAG                 DIGEST                                                                    IMAGE ID            CREATED             SIZE
alpine              latest              sha256:72c42ed48c3a2db31b7dafe17d275b634664a708d901ec9fd57b1529280f01fb   961769676411        4 days ago          5.58MB

# 根据摘要信息拉取镜像(镜像内容的变更一定会导致摘要散列值的变化)
[root@localhost ~]# docker image pull alpine@sha256:72c42ed48c3a2db31b7dafe17d275b634664a708d901ec9fd57b1529280f01fb
获取Image的方式
- 通过镜像仓库服务获取。
- 通过Dockerfile
构建。
镜像仓库服务
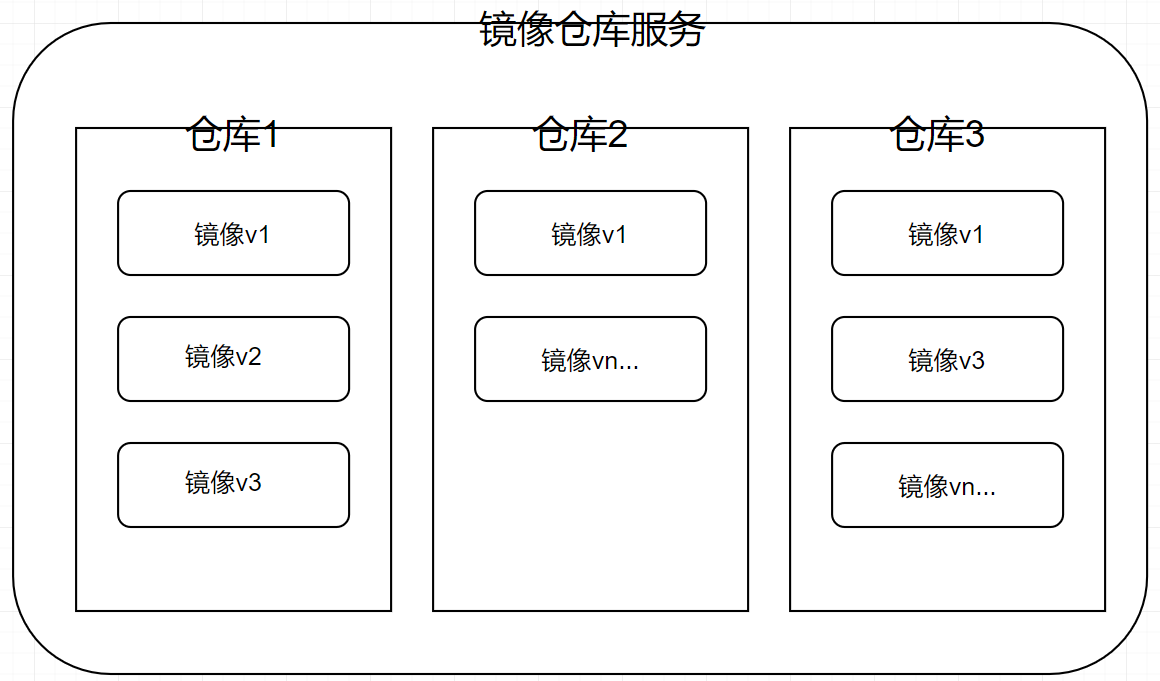
拉取的镜像位于Docker主机本地仓库中,Docker镜像存储在镜像仓库服务(Image Registry)当中。Docker客户端镜像仓库服务是可配置的,默认是Docker Hub。
镜像仓库服务包含多个镜像仓库,一个镜像仓库中又可以包含多个镜像。
# 拉取的镜像位于Docker主机本地仓库中,通过以下命令可以查看本地仓库中的所有镜像。
docker image ls
docker images
镜像仓库的分类
- Offiical Repository
- Unofficial Repository
如何定位镜像
通过名字加标签的组合定位一个镜像。
# 拉取ubuntu 版本号为 14.04
docker image pull ubuntu:14.04

# 如果不指定标签,则默认拉取latest最新的镜像。
docker image pull alpine

# 从非官方仓库拉取镜像:从tu-demo仓库中拉取v2镜像,其中镜像的拥有者是Docker Hub账户nigelpoulton(一个不应该被信任的账户)
docker image pull nigelpoulton/tu-demo:v2
docker image pull microsoft/dotnet:latest

# 从第三方镜像仓库服务获取镜像(非Docker Hub),则需要在镜像仓库名称前面加上第三方镜像仓库服务的DNS名称。假设镜像位于Google容器镜像仓库服务(GCR)中,则需要在仓库名称前面加上gcr.io,可能需要在拉取镜像前完成登录。
docker image pull gcr.io/nigelpoulton/tu-demo:v2
为镜像打多个标签
一个镜像可以根据用户需要设置多个标签,标签仅仅是存放在镜像元数据中的任意数字或字符串。
# 拉取仓库中的全部镜像,忽略tag
docker image pull -a nigelpoulton/tu-demo
过滤docker image ls 的输出内容
Docker提供 --filter 参数来过滤 docker image ls命令返回的镜像列表内容。
# 返回没有标签的镜像
[root@localhost ~]# docker image ls --filter dangling=true
REPOSITORY          TAG                 IMAGE ID            CREATED             SIZE
<none>              <none>              4dbbb3b1e7a9        6 weeks ago         914MB

# 返回带标签的镜像
[root@localhost ~]# docker image ls --filter dangling=false
REPOSITORY                                                 TAG                 IMAGE ID            CREATED             SIZE
alpine                                                     latest              961769676411        4 days ago          5.58MB

# 过滤并显示tag=latest的镜像
[root@localhost ~]# docker image ls --filter=reference="*:latest"
REPOSITORY          TAG                 IMAGE ID            CREATED             SIZE
alpine              latest              961769676411        4 days ago          5.58MB
lb-scale_web        latest              6a539fb0d274        6 weeks ago         918MB

# 格式化显示
[root@localhost ~]# docker image ls --format "{{.Repository}}: {{.Tag}}: {{.Size}}"
alpine: latest: 5.58MB
通过 CLI方式搜索Docker Hub
docker search 命令允许通过该CLI的方式搜索 Docker Hub。
# 查找所有NAME为nigelpoulton的仓库,NAME代表仓库名称,包含了Docker ID,或非官方仓库的组织名称。
[root@localhost ~]# docker search nigelpoulton
NAME                                 DESCRIPTION                                     STARS               OFFICIAL            AUTOMATED
nigelpoulton/pluralsight-docker-ci   Simple web app used in my Pluralsight videos…   17                                      [OK]
nigelpoulton/tu-demo                                                                 11

# 只显示官方镜像(默认显示的官方和非官方的)
[root@localhost ~]# docker search alpine --filter "is-official=true"
NAME                DESCRIPTION                                     STARS               OFFICIAL            AUTOMATED
alpine              A minimal Docker image based on Alpine Linux…   5585                [OK]

# Docker 默认只返回25行结果,使用--limit参数可以增加返回内容行数,最多为100行。
[root@localhost ~]# docker search microsoft --limit "100" | wc -l
101
删除镜像
# 删除指定镜像
[root@localhost ~]# docker image rm IMAGE ID

# 删除所有镜像
[root@localhost ~]# docker image rm ${docker image ls -q
} -f
通过docker file构建BaseImage
自定义dockfile创建本地image
[root@localhost hello-world]# yum install gcc glibc-static
[root@localhost hello-world]# mkdir hello-world
[root@localhost hello-world]# cd hello-world/
[root@localhost hello-world]# touch hello.c
[root@localhost hello-world]# vim hello.c
#include<stdio.h>
int main()
{
printf("hello docker\n");
}
[root@localhost hello-world]# gcc -static hello.c -o hello
[root@localhost hello-world]# ./hello
[root@localhost hello-world]# vim Dockerfile
FROM scratch
ADD hello /
CMD ["/hello"]
[root@localhost hello-world]# docker build -t soulboy/hello-wrld .
Sending build context to Docker daemon 860.7kB
Step 1/3 : FROM scratch
--->
Step 2/3 : ADD hello /
---> d476563481ef
Step 3/3 : CMD ["/hello"]
---> Running in ce031e741831
Removing intermediate container ce031e741831
---> 6a68cb96d615
Successfully built 6a68cb96d615
Successfully tagged soulboy/hello-wrld:latest
[root@localhost hello-world]# docker image ls
[root@localhost hello-world]# docker history 6a68cb96d615
IMAGE CREATED CREATED BY SIZE COMMENT
6a68cb96d615 3 minutes ago /bin/sh -c #(nop) CMD ["/hello"] 0B
d476563481ef 3 minutes ago /bin/sh -c #(nop) ADD file:feb1dec246efa459c⦠857kB
[root@localhost hello-world]# docker run soulboy/hello-wrld
hello docker
Container简介
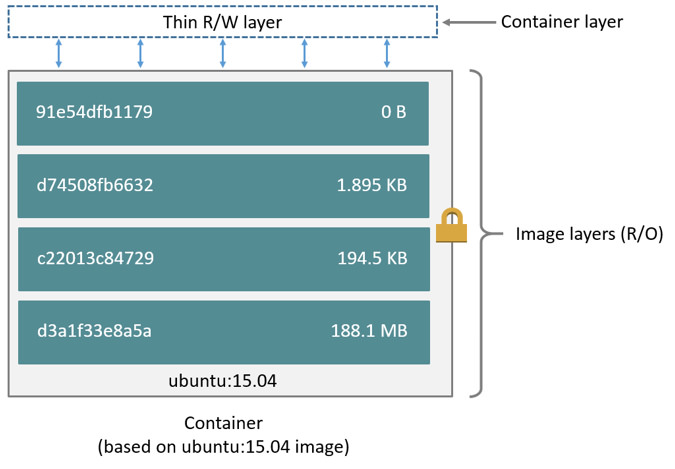
- 基于Image创建(copy)
- 在Image layer之上建立一个container layer(可读写)
- 类比面向对象:类(Image)和实例(Container)
- Image负责app的存储和分发,Container负责运行app。
容器管理命令
#查看所有容器
[root@localhost hello-world]# docker container ls -a
[root@localhost hello-world]# docker ps -a
#非交互式运行容器方法:运行完CMD就会退出。
[root@localhost hello-world]# docker run centos
#交互式运行容器方法
[root@localhost hello-world]# docker run -it centos
#删除指定容器:id可以是开头可以唯一区分的位数[root@localhost hello-world]# docker container rm CONTAINER_ID
[root@localhost hello-world]# docker rm CONTAINER_ID
#批量删除容器
[root@localhost hello-world]# docker rm $(docker container ls -aq)
#批量删除已经退出状态的容器
[root@localhost hello-world]# docker rm $(docker container ls -f "status=exited" -q)
镜像常用命令
[root@localhost hello-world]# docker images
[root@localhost hello-world]# docker image ls
[root@localhost hello-world]# docker image rm IMAGE_ID
[root@localhost hello-world]# docker rmi  IMAGE_ID
构建BaseImage两种方式
- 提倡通过Dockerfile的方式创建Image,因为Dockerfile可以查看构建流程,更加安全,基于容器创建Image并不推荐,因为用户使用Image不知道Image中到底加入了那哪东西,不安全。
- Dockerfile便于分享,只需分享Dockerfile对方就可以根据Dockerfile在本地自行构建。
在centos容器中安装Vim,然后将此容器变为新的Image。
#进入容器
[root@localhost ~]# docker exec -it cocky_merkle /bin/bash
#安装Vim
[root@060ef71c6a99 /]# yum install vim -y
#退出容器
[root@060ef71c6a99 /]# exit
#基于容器创建新的BaseImage
[root@localhost ~]# docker commit cocky_merkle soulboy/centos-vim
sha256:9601a7182c7b2b497869e3ce32d5dd800c069d34ae5db4e98a8d75ccf87ed132
[root@localhost ~]# docker images | grep soulboy
soulboy/centos-vim                latest              9601a7182c7b        28 seconds ago      362MB

#对比原始Centos镜像和新的Centos镜像区别
[root@localhost ~]# docker history centos
IMAGE               CREATED             CREATED BY                                      SIZE                COMMENT
9f38484d220f        3 months ago        /bin/sh -c #(nop)  CMD ["/bin/bash"]            0B
<missing>           3 months ago        /bin/sh -c #(nop)  LABEL org.label-schema.sc…   0B
<missing>           3 months ago        /bin/sh -c #(nop) ADD file:074f2c974463ab38c…   202MB

[root@localhost ~]# docker history soulboy/centos-vim
IMAGE               CREATED             CREATED BY                                      SIZE                COMMENT
9601a7182c7b        4 minutes ago       /bin/bash                                       160MB
9f38484d220f        3 months ago        /bin/sh -c #(nop)  CMD ["/bin/bash"]            0B
<missing>           3 months ago        /bin/sh -c #(nop)  LABEL org.label-schema.sc…   0B
<missing>           3 months ago        /bin/sh -c #(nop) ADD file:074f2c974463ab38c…   202MB

#提倡通过Dockerfile的方式创建Image,因为Dockerfile可以查看构建流程,更加安全,基于容器创建Image并不推荐,因为用户使用Image不知道Image中到底加入了那哪东西,不安全。
[root@localhost test]# mkdir docker-centos-vim
[root@localhost test]# cd docker-centos-vim/
[root@localhost docker-centos-vim]# vim Dockerfile
FROM centos
RUN yum install -y vim
[root@localhost docker-centos-vim]# docker build -t soulboy/centos-vim .
Sending build context to Docker daemon  2.048kB
Step 1/2 : FROM centos
 ---> 9f38484d220f
Step 2/2 : RUN yum install -y vim
 ---> Running in 1db6f9fb291a
Loaded plugins: fastestmirror, ovl
Determining fastest mirrors
 * base: mirrors.nju.edu.cn
 * extras: mirrors.nju.edu.cn
 * updates: mirrors.cn99.com
Resolving Dependencies
--> Running transaction check
---> Package vim-enhanced.x86_64 2:7.4.160-6.el7_6 will be installed
--> Processing Dependency: vim-common = 2:7.4.160-6.el7_6 for package: 2:vim-enhanced-7.4.160-6.el7_6.x86_64
Removing intermediate container 1db6f9fb291a
 ---> 2de975c65628
Successfully built 2de975c65628
Successfully tagged soulboy/centos-vim:latest

[root@localhost docker-centos-vim]# docker images
REPOSITORY                        TAG                 IMAGE ID            CREATED              SIZE
soulboy/centos-vim                latest              2de975c65628        About a minute ago   362MB

#基于新Image创建并运行容器
[root@localhost docker-centos-vim]# docker run -it soulboy/centos-vim
[root@060ef71c6a99 /]# exit
[root@localhost docker-centos-vim]# docker exec -it cocky_merkle /bin/bash
[root@060ef71c6a99 /]# vim --help
Dockerfile简介
Docker可以通过阅读来Dockerfile的指令以自动构建Image。Dockerfile是一个文本文档,其中包含用户可以在命令行上调用的所有命令以组合Image。基于docker build命令可以在Dockerfile中定义一个连续执行多条命令行指令的自动构建镜像的过程。
传送门
Dockerfile语法解析
# 制作Base Image(不依赖于任何Base Image)
FROM scratch

# 使用Base Image(尽量使用官方的Image作为Base Image,为了安全考虑。)
FROM centos

# 注释
LABEL maintainer="xxx@gmail.com"
LABEL version="1.0"
LABEL description="This is description"

# 运行命令(每运行一次RUN都会生成新的一层,因此复杂的RUN应该使用反斜线换行,以避免无用的分享,合并多条命令成一行!)
RUN yum update && yum install -y vim\
python-dev

# 设定当前工作目录 类似于cd(用WORKDIR,不要用RUN cd,尽量使用绝对目录!)
WORKDIR /test    #如果没有test目录会自动创建test目录
WORKDIR demo
RUN pwd   #输出结果为: /test/demo

# ADD 添加文件到到Image的指定目录
ADD hello /	#拷贝hello文件到Image的根目录中
ADD test.tar.gz /  #添加到根目录并解压

# COPY 复制文件到指定目录(多数情况下,COPY优于ADD! ADD除了COPY还有额外功能解压,添加远程文件/目录可以使用curl或者wget!)
WORKDIR /root
COPY hello test/     #/root/test/hello

# ENV 宏定义,方便引用
ENV MYSQL_VERSION 5.6 #设置常量
RUN yum install -y mysql-server="${MYSQL_VERSION}"\
 && echo 123 #引用常量
RUN、CMD、ENTRYPOINT对比
-
RUN:执行命令并创建新的Image Layer。容器启动时默认执行的命令,如果docker run指定了其他命令(Docker run -it [image] /bin/bash),CMD命令会被忽略。如果定义了多个CMD,只有最后一个会执行。
-
CMD: 设置容器启动后默认执行的命令和参数.
-
ENTRYPOINT:设置容器启动时运行的命令.让容器以应用程序或者服务的形式运行。不会被忽略,一定会执行。
发布镜像
# 本地登录dockerhub用户
[root@localhost ~]# docker login
Login Succeeded

# pull的格式: dockerhub_count/Image_name
[root@localhost hello-world]# docker push rtsfan1024/hello-world:latest
Dockerfile构建Image(Flask的APP)
部署一个基于flask的python镜像
# 安装pip
[root@localhost test]# yum install python-pip
[root@localhost test]#
python -m pip install –upgrade pip

#安装flask
[root@localhost Python-3.7.3]# pip install --trusted-host pypi.python.org --trusted-host py --trusted-host files.pythonhosted.org flask

# 运行app.py 并访问 http://192.168.31.210:5000/
[root@localhost test]# python app.py
 * Serving Flask app "app" (lazy loading)
 * Environment: production
   WARNING: This is a development server. Do not use it in a production deployment.
   Use a production WSGI server instead.
 * Debug mode: off
 * Running on http://0.0.0.0:5000/ (Press CTRL+C to quit)
192.168.31.230 - - [23/Jun/2019 22:24:16] "GET / HTTP/1.1" 200 -
192.168.31.230 - - [23/Jun/2019 22:24:20] "GET /favicon.ico HTTP/1.1" 404 -

#  创建目录编写Dockerfile
[root@localhost test]# cd /test
[root@localhost test]# mkdir flask-hello-world

# 编写Dockerfile文件
[root@localhost test]# cat /test/flask-hello-world/Dockerfile
FROM python:2.7
LABEL maintainer="Soul Boy<rtsfan1024@gmail.com>"
RUN pip install flask -i http://pypi.douban.com/simple --trusted-host pypi.douban.com
COPY app.py /app/
WORKDIR /app
EXPOSE 5000
CMD ["python", "app.py"]

# 基于Flask框架的python应用代码
[root@localhost test]# cat /test/flask-hello-world/app.py
from flask import Flask
app = Flask(__name__)
@app.route('/')
def hello():
    return "hello docker"
if __name__ == '__main__':
    app.run(host="0.0.0.0", port=5000)

# 基于Dockerfile构建Image
[root@localhost flask-hello-world]# cd /test/flask-hello-world/
[root@localhost flask-hello-world]# docker build -t rtsfan1024/flask-hello-world .
[root@localhost flask-hello-world]# docker run -d -p 5000:5000 rtsfan1024/flask-hello-world:latest

# 访问http://192.168.31.210:5000/
`hello docker`
容器操作
# 进入已存在的容器
docker exec -it container_id /bin/bash

# 停止容器
docker stop container_id

# 删除容器(退出状态的容器)
docker rm container_id

# 指定创建容器时指定名称(名字也具有唯一性)
docker run -d --name=demo Image

# 分析容器
docker inspect redis

# 容器运行日志
docker logs container_id
通过Dockerfile构建工具
[root@localhost flask-hello-world]# mkdir -pv /test/stress
[root@localhost flask-hello-world]# cat /test/stress/Dockerfile
FROM centos
RUN yum install -y epel-release && yum install -y stress
ENTRYPOINT ["/usr/bin/stress"]
CMD []
[root@localhost flask-hello-world]# cd /test/stress/
[root@localhost stress]# docker build -t rtsfan1024/stress .

# ENTRYPOINT + CMD : 命令 + 接收参数
[root@localhost stress]# docker run -it rtsfan1024/stress:latest --vm 1 --verbose
stress: info: [1] dispatching hogs: 0 cpu, 0 io, 1 vm, 0 hdd
stress: dbug: [1] using backoff sleep of 3000us
stress: dbug: [1] --> hogvm worker 1 [6] forked
stress: dbug: [6] allocating 268435456 bytes ...
stress: dbug: [6] touching bytes in strides of 4096 bytes ...
stress: dbug: [6] freed 268435456 bytes
容器的资源限制
容器的内存限定
#swap默认不设置与memory一致,也就是 200M + 200M = 400M,而stress每次分配和回收的内存为256M。 如果添加选项 --vm-bytes 500M ,则会报错,因为宿主机分配给容器的内容总量为400M。
[root@localhost ~]# docker run --memory=200M rtsfan1024/stress:latest --vm 1 --verbose
stress: info: [1] dispatching hogs: 0 cpu, 0 io, 1 vm, 0 hdd
stress: dbug: [1] using backoff sleep of 3000us
stress: dbug: [1] --> hogvm worker 1 [6] forked
stress: dbug: [6] allocating 268435456 bytes ...
stress: dbug: [6] touching bytes in strides of 4096 bytes ...
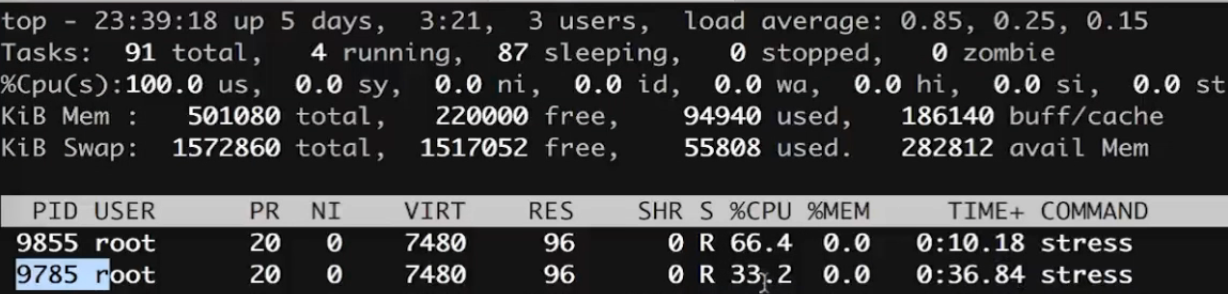
容器的CPU限定(relative weight 相对权重)
# 第一个容器
[root@localhost ~]# docker run --cpu-shares=10 --name=test1 rtsfan1024/stress:latest --cpu 1
# 第二个容器
[root@localhost ~]# docker run --cpu-shares=5 --name=test2 rtsfan1024/stress:latest --cpu 1
使用top命令查看CPU占占用率(test1的占用率是test2的两倍)