Config
配置中心的由来
分布式系统中往往部署在 N 服务器上,逐一管理维护成本很高,所以配置中心应运而生。配置中心被用作集中管理不同环境(Dev、Test、Stage、Prod)和不同集群配置,以及在修改配置后将实时动态推送到应用上进行刷新。
#配置中心应具备的功能

- OpenAPI
- 业务无关性
- 配置生效监控
- 一致性 K-V 存储
- 统一配置实时推送
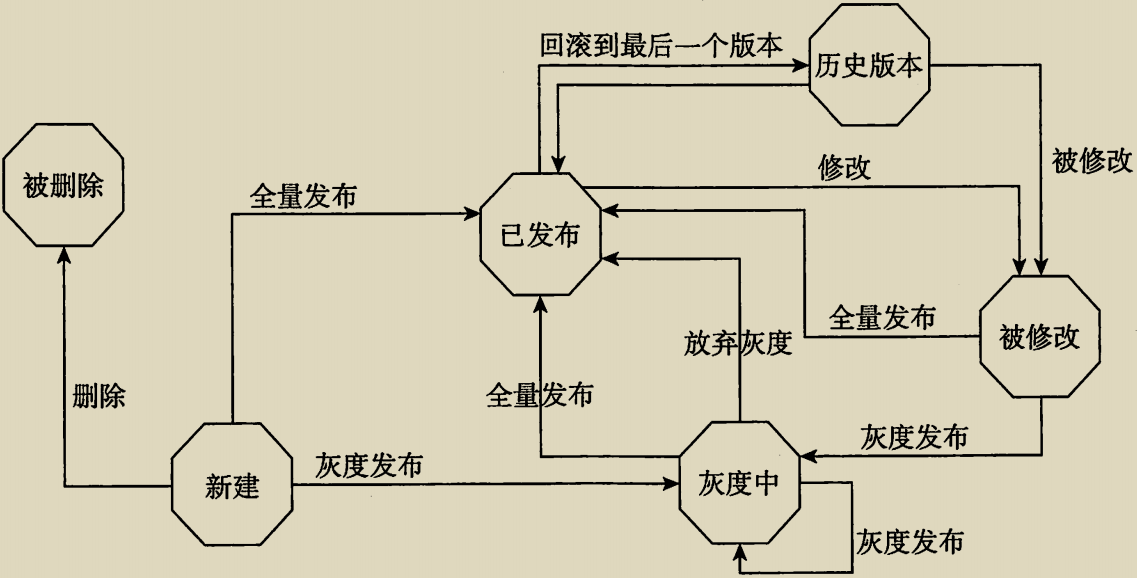
- 配合灰度与更新
- 配置全局恢复、备份与历史
- 高可用集群
Spring Cloud Config
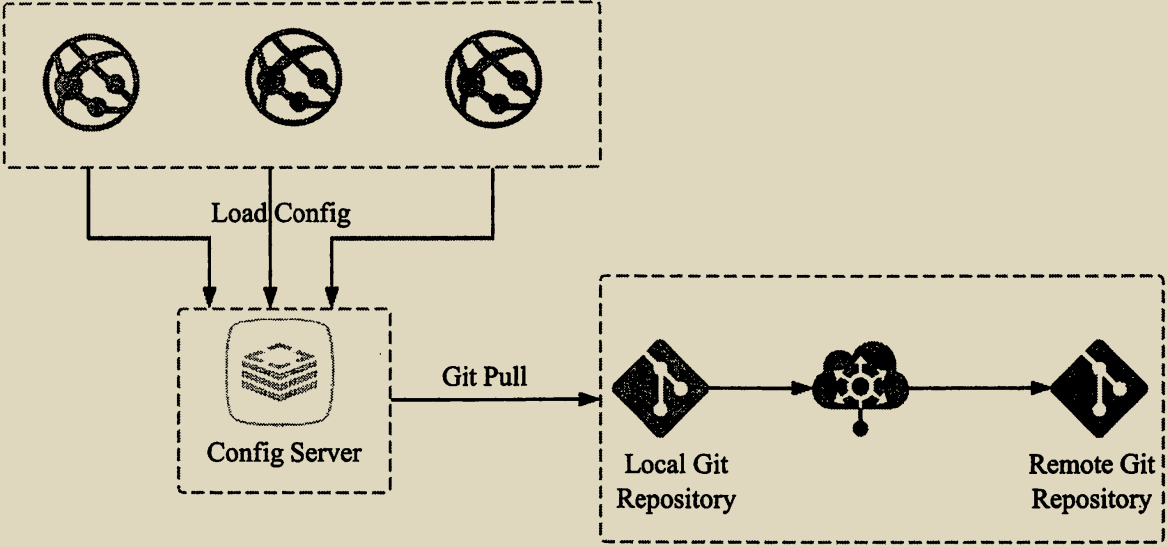
Spring Cloud Config 是一个集中化外部配置的分布式系统,由服务端和客户端组成。它不依赖于注册中心,是一个独立的配置中心。 支持多种存储配置信息的形式:JDBC、Vault、Native、SVN、Git。
Git 版工作原理

- 客户端启动时候向 ConfigServer 发起请求
- ConfigServer 接收服务端请求后,根据配置的仓库地址,将 Git 上的文件克隆到本地的一个临时目录中(此目录是一个 Git 的本地仓库目录)。
- 然后 ConfigServer 再读取本地文件返回给客户端(优点:Git 服务器网络故障,依然可以使用 ConfigServer 的本地 Git 仓库目录作为缓存继续为客户端提供服务)。
Git 服务器结合 Config Server 搭建分布式配置中心
使用 Git 服务器,可以自己搭建 GitLab 服务器;又或者可以使用 GitHub、开源中国 Git、阿里云 Git。
添加依赖
 1<!-- config-server依赖 -->
 2        <dependency>
 3            <groupId>org.springframework.cloud</groupId>
 4            <artifactId>spring-cloud-config-server</artifactId>
 5        </dependency>
 6        <!-- 后续config-server做HA需要用到eureka-client -->
 7        <dependency>
 8            <groupId>org.springframework.cloud</groupId>
 9            <artifactId>spring-cloud-starter-netflix-eureka-client</artifactId>
10        </dependency>
添加注解 @EnableConfigServer
1@SpringBootApplication
2@EnableConfigServer
3
4public class ConfigServerApplication {
5    public static void main(String[] args) {
6        SpringApplication.run(ConfigServerApplication.class, args);
7    }
8}
配置服务
 1#服务名称
 2spring:
 3  application:
 4    name: config-server
 5  cloud:
 6    config:
 7      server:
 8        git:
 9          uri: https://github.com/zzz/git_learning.git
10          username: xxx
11          password: yyy
12          timeout: 5  #超时时间
13          default-label: master #分支
14
15#服务的端口号
16server:
17  port: 9100
18
19#指定注册中心地址
20eureka:
21  client:
22    serviceUrl:
23      defaultZone: http://localhost:8761/eureka/
Git 仓库中创建 product-service-test.yaml
 1server:
 2  port: 8772
 3
 4# #服务的名称
 5# spring:
 6#   application:
 7#     name: product-service
 8#   cloud:
 9#     client:
10#       ipAddress: 192.168.31.230
11#   zipkin:
12#     base-url: http://192.168.31.210:9411/
13#   sleuth:
14#     sampler:
15#       probability: 1
16
17# #指定注册中心地址
18# eureka:
19#   client:
20#     serviceUrl:
21#       defaultZone: http://localhost:8761/eureka/
22#   instance:
23#     preferIpAddress: true
24#     instance-id: ${spring.cloud.client.ipAddress}:${server.port}:${spring.application.name}
25env: test3
26branch: master
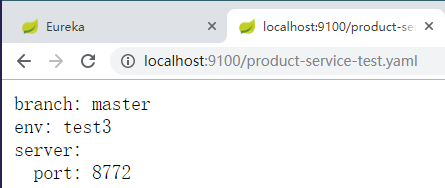
访问配置中心如下: http://localhost:9100/product-service-test.yaml

配置中心访问规则
/{label}/{application.name}-{profiles}.yml
- name:服务器名称
- profile:环境名称,开发、测试、生产
- lable:仓库分支、默认 master 分支
支持多种格式的自动转换,只需更改文件的访问后缀即可。
- /{application.name}-{profiles}.properties
- /{application.name}-{profiles}.yml
- /{application.name}-{profiles}.json
config 客户端使用
添加依赖
1<!--config客户端依赖-->
2        <dependency>
3            <groupId>org.springframework.cloud</groupId>
4            <artifactId>spring-cloud-config-client</artifactId>
5        </dependency>
配置服务:修改将 application.yaml 改为 bootstrap.yml
 1#server: #Provider服务监听的端口,service-id: CONFIG-SERVER
 2解析是需要用到注册中心
 3#  port: 8771
 4
 5eureka: #指定注册中心地址
 6  client:
 7    serviceUrl:
 8      defaultZone: http://localhost:8761/eureka/
 9  instance:
10    prefer-ip-address: true #调试Eureka管控台实例的显示格式
11    instance-id: ${spring.cloud.client.ipAddress}:${server.port}:${spring.application.name}
12
13spring: #服务的名称
14  application:
15      name: product-service
16 #相当于访问路径中的application.name
17  cloud:
18    client:
19      ipAddress: 192.168.31.230
20    config:
21      discovery:
22        service-id: CONFIG-SERVER
23        enabled: true
24      profile: test
25	#相当于访问路径中的profiles	用于 product-service-dev | product-service-test
26      #label: test   #建议用lable去区分环境,默认是lable是master分支
访问 Eureka 注册中心发现 product-service 端口已改变

config 客户端原理分析
- 首先会取读取本地 bootstrap.yml,根器其中内容定位到注册中心
- 从注册中心获取 CONFIG-SERVER 的通信地址
- 客户端如果没有明确配置 label 属性,则以默认值为 master,以此值替代访问路径中的{label}部分
- 以客户端的服务名称作为访问路径中的{application.name}部分。
- 以 profile 属性设置的值为访问路径中的{profiles}部分。