
LNMP
Mysql5.7安装
Nginx1.1.6.0安装
# 下载
[root@localhost software]# wget https://nginx.org/download/nginx-1.16.0.tar.gz

# 依赖
[root@localhost software]# yum install -y pcre pcre-devel openssl openssl-devel gcc gcc-c++ autoconf automake make

# 编译安装步骤
[root@localhost software]# tar xf nginx-1.16.0.tar.gz
[root@localhost software]# cd nginx-1.16.0

[root@localhost nginx-1.16.0]# useradd -s /sbin/nologin www -M
[root@localhost ~]# mkdir /application

[root@localhost nginx-1.16.0]# ./configure --user=www --group=www --prefix=/application/nginx-1.16.0 --with-http_stub_status_module --with-http_ssl_module --with-pcre
[root@localhost nginx-1.16.0]# make
[root@localhost nginx-1.16.0]# make install
[root@localhost nginx-1.16.0]# ln -s /application/nginx-1.16.0/ /application/nginx

# 启动服务
[root@localhost nginx-1.16.0]# /application/nginx/sbin/nginx

# 发现nginx监听在80端口上
[root@localhost nginx-1.16.0]# netstat  -tnlp | grep nginx
tcp        0      0 0.0.0.0:80              0.0.0.0:*               LISTEN      31813/nginx: master

# 访问nginx
http://192.168.31.210/
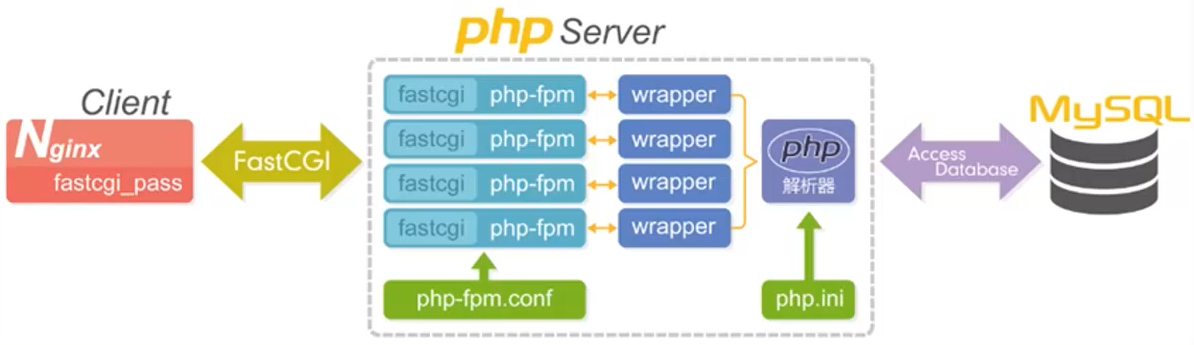
FastCGI
将脚本解析服务器和HTTP服务器分离开来,同时还能在脚本解析服务器上启动一个或多个脚本解析守护进程。当HTTP服务器遇到动态程序时,可以将其直接交付给FastCGI进程执行,然后将得到的结果返回给浏览器。这种方式可以让HTTP服务器专一地处理静态请求,将动态服务器的结果返回给客户端,很大程度上提高了整个应用系统的性能。PHP动态语言服务端可以启动多个FastCGI的守护进程(php-fpm),HTTP服务通过FastCGI客户端(Nginx fastcgi_pass)和动态语言 FastCGI服务端(php-fpm)通信。
安装php-7.3.5
# 依赖
[root@localhost nginx-1.16.0]# yum install zlib-devel libxml2-devel libjpeg-devel libjpeg-turbo-devel libiconv-devel freetype-devel libpngdevel gd-devel libcurl-devel libxslt-devel -y

# 检查是否安装成功
[root@localhost nginx-1.16.0]# rpm -qa zlib-devel libxml2-devel libjpeg-turbo-devel libiconv-devel
zlib-devel-1.2.7-19.el7_9.x86_64
libxml2-devel-2.9.1-6.el7.5.x86_64
libjpeg-turbo-devel-1.2.90-8.el7.x86_64
提示:缺少libiconv-devel

[root@localhost nginx-1.16.0]# rpm -qa freetype-devel libpng-devel gd-devel libcurl-devel libxslt-devel
libpng-devel-1.5.13-8.el7.x86_64
freetype-devel-2.8-14.el7_9.1.x86_64
gd-devel-2.0.35-27.el7_9.x86_64
libcurl-devel-7.29.0-59.el7_9.1.x86_64
libxslt-devel-1.1.28-6.el7.x86_64

# 由于yum无法安装libiconv库,因此需要手动安装
[root@localhost software]# wget http://ftp.gnu.org/pub/gnu/libiconv/libiconv-1.16.tar.gz
[root@localhost software]# tar zxf libiconv-1.16.tar.gz
[root@localhost software]# cd libiconv-1.16
[root@localhost libiconv-1.16]# ./configure --prefix=/application/libiconv
[root@localhost libiconv-1.16]# make && make install

# 安装libmcrypt库、mcrypt库、mhash库(配置阿里云YUM,原生YUM源中没有)
[root@localhost libiconv-1.16]# yum install -y libmcrypt-devel mcrypt mhash

# 安装php-7.3.5 (--with-fpm-user=www  此处与nginx的用户组统一)
[root@localhost software]# wget https://www.php.net/distributions/php-7.3.5.tar.gz
[root@localhost software]# tar xf php-7.3.5.tar.gz
[root@localhost software]# cd php-7.3.5
[root@localhost software]# ./configure \
--prefix=/application/php7.3.5 \
--enable-mysqlnd \
--with-mysqli=mysqlnd \
--with-pdo-mysql=mysqlnd \
--with-iconv-dir=/application/libiconv \
--with-freetype-dir \
--with-jpeg-dir \
--with-png-dir \
--with-zlib \
--with-libxml-dir=/usr \
--enable-xml \
--disable-rpath \
--enable-bcmath \
--enable-sysvsem \
--enable-inline-optimization \
--with-curl \
--enable-mbregex \
--enable-fpm \
--enable-mbstring \
--with-gd \
--with-openssl \
--with-mhash \
--enable-pcntl \
--enable-sockets \
--with-xmlrpc \
--enable-soap \
--enable-short-tags \
--enable-static \
--with-xsl \
--with-fpm-user=www \
--with-fpm-group=www \
--enable-ftp \
--enable-opcache=no

[root@localhost php-7.3.5]# make && make install

[root@localhost ~]# ln -s /application/php7.3.5/ /application/php

# 配置php.ini(PHP解析器配置文件)
[root@localhost ~]# cp /software/php-7.3.5/php.ini-development /application/php/lib/php.ini

# 配置PHP FPM
[root@localhost ~]# cp /application/php/etc/php-fpm.conf.default /application/php/etc/php-fpm.conf
[root@localhost ~]# cp /application/php/etc/php-fpm.d/www.conf.default  /application/php/etc/php-fpm.d/www.conf

# 启动PHP服务
[root@localhost ~]# /application/php/sbin/php-fpm
[root@localhost ~]# pkill php-fpm	# php-fpm没有重启命令,只能kill 再起
[root@localhost ~]# netstat -lntp | grep php-fpm
tcp        0      0 127.0.0.1:9000          0.0.0.0:*               LISTEN      10691/php-fpm: mast
配置Nginx转发PHP请求
# 注释掉,修改为这样
[root@localhost conf]# vim /application/nginx/conf/nginx.conf
        location ~ .*\.(php|php5)?$ {	# 这里需要修改
            root           html;
            fastcgi_pass   127.0.0.1:9000;
            fastcgi_index  index.php;
            #fastcgi_param  SCRIPT_FILENAME  /scripts$fastcgi_script_name;
            include        fastcgi.conf;
        }


# 重启
[root@localhost conf]# /application/nginx/sbin/nginx -s stop
[root@localhost conf]# /application/nginx/sbin/nginx

# 编写php测试文件

[root@localhost conf]# echo "<?php phpinfo(); ?>" > /application/nginx/html/test_info.php
[root@localhost conf]# /application/php/bin/php /application/nginx/html/test_info.php

# 访问http://192.168.31.210/test_info.php
成功...

# 编写php访问mysql的测试文件
[root@localhost conf]# vim /application/nginx/html/test_mysql.php
<?php
$link=mysqli_connect("localhost","root","123");
if(!$link) echo "FAILD!连接错误,用户名密码不对";
else echo "OK!可以连接";
?>

# 访问http://192.168.31.210/test_mysql.php
成功...