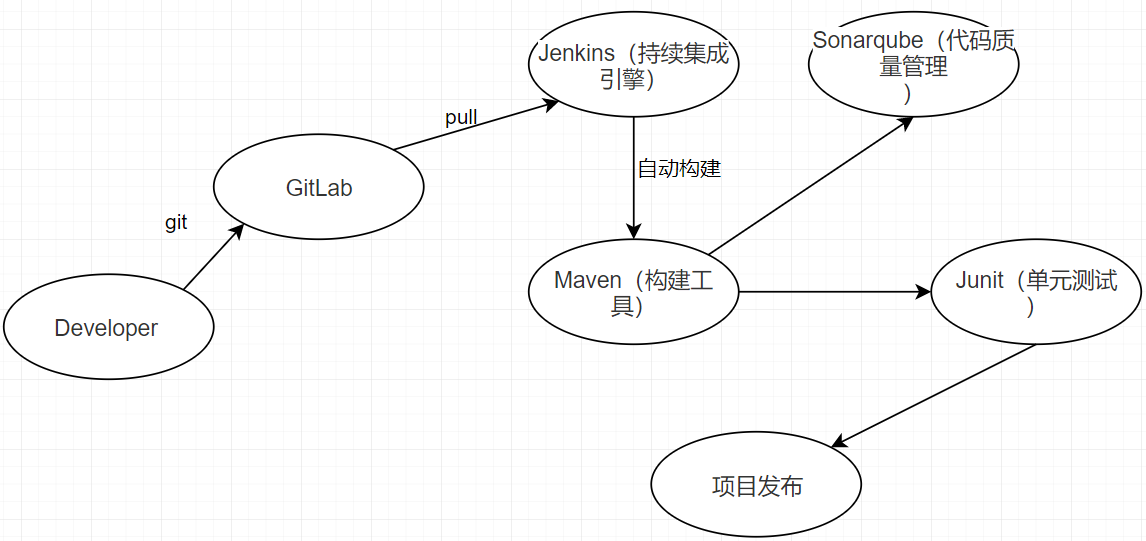
Continuous Integration
持续集成

持续集成是一种软件开发实践,即团队开发成员经常集成他们的工作,通过每个成员每天至少集成一次,也就意味着每天可能会发生多次集成。每次集成都通过自动化的构建(包括编译,发布,自动化测试)来验证,从而尽早地发现集成错误。
JDK
 1[root@localhost test]# tar -zxvf jdk-8u91-linux-x64.tar.gz -C /usr/local/
 2[root@localhost jdk1.8.0_91]# pwd
 3[root@localhost jdk1.8.0_91]# vim /etc/profile
 4/usr/local/jdk1.8.0_91
 5JAVA_HOME=/usr/local/jdk1.8.0_91
 6export JAVA_HOME
 7CLASSPATH=.:$JAVA_HOME/lib
 8export CLASSPATH
 9PATH=$PATH:$JAVA_HOME/bin:$CLASSPATH
10export PATH
11[root@localhost jdk1.8.0_91]# source /etc/profile
12[root@localhost jdk1.8.0_91]# java -version
13java version "1.8.0_91"
14Java(TM) SE Runtime Environment (build 1.8.0_91-b14)
15Java HotSpot(TM) 64-Bit Server VM (build 25.91-b14, mixed mode)
Maven
 1[root@localhost test]# tar -zxvf apache-maven-3.5.3-bin.tar.gz -C /usr/local/
 2[root@localhost apache-maven-3.5.3]# pwd
 3/usr/local/apache-maven-3.5.3
 4[root@localhost apache-maven-3.5.3]# vim /etc/profile
 5MAVEN_HOME=/usr/local/apache-maven-3.5.3
 6export MAVEN_HOME/bin
 7PATH=$PATH:$MAVEN_HOME
 8export PATH
 9[root@localhost apache-maven-3.5.3]# source /etc/profile
10[root@localhost apache-maven-3.5.3]# mvn --version
11Apache Maven 3.5.3 (3383c37e1f9e9b3bc3df5050c29c8aff9f295297; 2018-02-25T03:49:05+08:00)
Maven 私服 Nexus
1[root@localhost test]# tar -zxvf nexus-3.12.1-01-unix.tar.gz -C /usr/local/
2[root@localhost nexus-3.12.1-01]# pwd
3/usr/local/nexus-3.12.1-01
4
5# 修改任意端口,避免与本地端口冲突
6[root@localhost nexus-3.12.1-01]# vim etc/nexus-default.properties
7application-port=8090
8
9# 防火墙开放8081端口
10[root@localhost nexus-3.12.1-01]vim /etc/sysconfig/iptables
11-A INPUT -m state --state NEW -m tcp -p tcp --dport 8081 -j ACCEPT
12[root@localhost nexus-3.12.1-01] service iptables restart
13
14# 启动Nexus服务
15[root@localhost nexus-3.12.1-01]# useradd nexus
16[root@localhost bin]# chown -R nexus:nexus /usr/local/sonatype-work/
17[root@localhost nexus-3.12.1-01]# chown -R nexus:nexus /usr/local/nexus-3.12.1-01/
18[root@localhost nexus-3.12.1-01]# su nexus
19[nexus@localhost nexus-3.12.1-01]$ cd bin/
20[nexus@localhost bin]$ ./nexus start
21Starting nexus
22
23# Sign In
24admin
25admin123
26
27# 修改ulimit
28[root@localhost bin]# ulimit -a
29[root@localhost bin]# vim /etc/security/limits.conf
30* soft nofile 65535
31* hard nofile 65535
32
33# 设置开机自动启
34[root@localhost bin]# vim /etc/rc.d/rc.local
35su - nexus -c '/usr/local/nexus-3.12.1-01/bin/nexus start'
仓库类型

proxy:代理仓库,用于代理远程仓库
group:仓库组,通常包含了多个代理仓库和宿主仓库,在项目中只要引入仓库组就可以下载到代理仓库和宿主仓库中的包
hosted:宿主仓库,内部项目、付费 jar releases 发布内部 release 版本的仓库 snapshots 发布内部 snapshots 版本的仓库 third 自建第三方 jar
配置代理
1选择阿里云
2http://maven.aliyun.com/nexus/content/groups/public/
使用 Nexus 私服作为代理下载
修改 maven 目录下的 conf/setting.xml
 1<?xml version="1.0" encoding="UTF-8"?>
 2
 3<settings xmlns="http://maven.apache.org/SETTINGS/1.0.0" xmlns:xsi="http://www.w3.org/2001/XMLSchema-instance" xsi:schemaLocation="http://maven.apache.org/SETTINGS/1.0.0 http://maven.apache.org/xsd/settings-1.0.0.xsd">
 4  <pluginGroups/>
 5  <proxies/>
 6  <servers>
 7    <server>
 8      <id>xdclass-releases</id>
 9      <username>admin</username>
10      <password>admin123</password>
11    </server>
12    <server>
13      <id>xdclass-snapshots</id>
14      <username>admin</username>
15      <password>admin123</password>
16    </server>
17  </servers>
18  <mirrors/>
19  <profiles>
20    <profile>
21      <id>xdclass</id>
22      <activation>
23        <activeByDefault>false</activeByDefault>
24      </activation>
25      <!-- 私有库地址-->
26      <repositories>
27        <repository>
28          <id>xdclass</id>
29          <url>http://192.168.31.251:8090/repository/maven-public/</url>
30          <releases>
31            <enabled>true</enabled>
32          </releases>
33          <snapshots>
34            <enabled>true</enabled>
35          </snapshots>
36        </repository>
37      </repositories>
38      <!--插件库地址-->
39      <pluginRepositories>
40        <pluginRepository>
41          <id>xdclass</id>
42          <url>http://192.168.31.251:8090/repository/maven-public/</url>
43          <releases>
44            <enabled>true</enabled>
45          </releases>
46          <snapshots>
47            <enabled>true</enabled>
48          </snapshots>
49        </pluginRepository>
50      </pluginRepositories>
51    </profile>
52  </profiles>
53  <activeProfiles>
54    <activeProfile>xdclass</activeProfile>
55  </activeProfiles>
56</settings>
项目工程上传至 Nexus 私服
修改项目中的 pom.xml 文件
deploy
 1<!--pom.xml 远程仓库的配置  id要跟本地maven的setting.xml相同 -->
 2    <distributionManagement>
 3        <repository>
 4            <id>xdclass-releases</id>
 5            <name>Ruizhi Release Repository</name>
 6            <url>http://192.168.31.251:8090/repository/maven-releases/</url>
 7        </repository>
 8        <snapshotRepository>
 9            <id>xdclass-snapshots</id>
10            <name>Ruizhi Snapshot Repository</name>
11            <url>http://192.168.31.251:8090/repository/maven-snapshots/</url>
12        </snapshotRepository>
13    </distributionManagement>
编译安装 Mysql5.7
代码质量管理平台 sonarqube
 1# 解压
 2[root@localhost software]# unzip sonarqube-6.7.4.zip
 3[root@localhost software]# mv sonarqube-6.7.4 /usr/local/
 4
 5# mysql里新增数据库
 6mysql> CREATE DATABASE sonar DEFAULT CHARACTER SET utf8;
 7
 8# 修改sonarqube相应的配置
 9[root@localhost software]# vim /usr/local/sonarqube-6.7.4/conf/sonar.properties
10sonar.jdbc.username=root
11sonar.jdbc.password=soulbo
12sonar.jdbc.url=jdbc:mysql://localhost:3306/sonar?useUnicode=true&characterEncoding=utf8&rewriteBatchedStatements=true&useConfigs=maxPerformance&useSSL=false
13sonar.web.context=/sonar
14sonar.web.host=0.0.0.0
15
16# 新增用户,并将目录所属权赋予该用户
17[root@localhost software]# useradd sonar
18[root@localhost software]# chown -R sonar:sonar /usr/local/sonarqube-6.7.4/
19
20# 启动sonarque
21[root@localhost software]# su sonar
22[sonar@localhost bin]$ /usr/local/sonarqube-6.7.4/bin/linux-x86-64/sonar.sh start
23Starting SonarQube...
24Started SonarQube.
25
26# 访问URL (默认账户名和密码都是 admin)
27http://192.168.31.251:9000/sonar
28
29# 生成令牌
30soulboy: 6045fbb8fee168c51160a9753e0948952884d398
31
32# 将项目代码使用以下命令进行提交由sonarqube进行分析,完成后,查看相应的分析结果
33mvn sonar:sonar \
34  -Dsonar.host.url=http://192.168.31.251:9000/sonar \
35  -Dsonar.login=6045fbb8fee168c51160a9753e0948952884d398
Jenkins
前置条件
- JDK
- Tomcat
部署 Tomcat
1[root@localhost software]# useradd tomcat
2[root@localhost software]# passwd tomcat
3[root@localhost software]# tar -zxvf apache-tomcat-9.0.8.tar.gz -C /usr/local/
4[root@localhost software]# chown -R tomcat:tomcat /usr/local/apache-tomcat-9.0.8/
5[root@localhost software]# su tomcat
部署 Jenkins
1# 将Jenkins上传到tomcat的webapp目录 chown tomcat:tomcat Jenkins.war
2[root@localhost software]# mv jenkins.war /usr/local/apache-tomcat-9.0.8/webapps/
3[root@localhost software]# chown tomcat:tomcat /usr/local/apache-tomcat-9.0.8/webapps/jenkins.war
4
5# 启动tomcat
6[tomcat@localhost software]$ /usr/local/apache-tomcat-9.0.8/bin/startup.sh
7
8# 访问URL
9http://192.168.31.251:8080/
10
11# 如果出现问题查看日志
12[tomcat@localhost software]$ more /usr/local/apache-tomcat-9.0.8/logs/catalina.out
13
14# tomcat默认端口为8080,如果需要修改端口
15[tomcat@localhost software]$ vim /usr/local/apache-tomcat-9.0.8/conf/server.xml
16<Connector port="9999" protocol="HTTP/1.1"
17
18# 访问tomcat
19http://192.168.31.251:9999/jenkins
20
21# 查看默认内容
22[tomcat@localhost software]$ more /home/tomcat/.jenkins/secrets/initialAdminPassword
2383b24bc989d946529185de097756d205
24
25# 将https改为http,之后提交,重启tomcat
26http://192.168.31.251:9999/jenkins/pluginManager/advanced
27
28# 重新安装
29[tomcat@localhost software]$ /usr/local/apache-tomcat-
30[tomcat@localhost software]$ /usr/local/apache-tomcat-9.0.8/bin/startup.sh
31http://192.168.31.251:9999/jenkins
32more /home/tomcat/.jenkins/secrets/initialAdminPassword 选择默认安装
33选择安装推荐插件
34
35http://192.168.31.251:9999/jenkins
36
37# 如果需要重新安装Jenkins
38[root@localhost bin]# rm -rf /home/tomcat/.jenkins
39[root@localhost bin]# rm -rf /usr/local/apache-tomcat-9.0.8/webapps/jenkins
Jenkins 插件安装及配置
插件安装(系统管理--》插件管理)
11.安装Maven Integration plugin
22.安装SonarQube Scanner for Jenkins
33.Publish Over SSH --发布到远程服务器
系统配置(系统管理--》全局工具配置)
1.配置 JDK
2.配置 maven
3.配置 sonar
4.邮件配置 系统管理--》系统设置--》邮件通知--》 smtp 服务器 smtp.qq.com 用户默认邮件后缀 @qq.com 勾选 ssl Reply-To Address 发件者邮箱 之后测试一下配置,无误即可
配置 sonarqube
配置 GitLab